Life As We Know It
Life As We Know It
  • Home
  • Blog
  • Recipe Index
  • My Amazon Store
  • All About Me!
  • Body By Vi Recipes

No Time To Be a Crafty Mommy

11/21/2012

0 Comments

 
Picture
As we've discussed before, I wish I was a crafty mommy. I've been saving all these wicked looking projects on Pinterest in case I at some point find the time to try some of them out. So far that hasn't happened.
Between being a mommy, a wife, playschool 2 days a week, work 3 times a week, many social obligations, and studying everywhere in between, there's hardly enough time to complete the necessary tasks, let alone any time left over for extras.
So, in hopes that some of you might have time to create awesomeness, I thought I'd share a few of my favorite ideas with you I've been saving.
At the top of my list is salt dough ornaments!
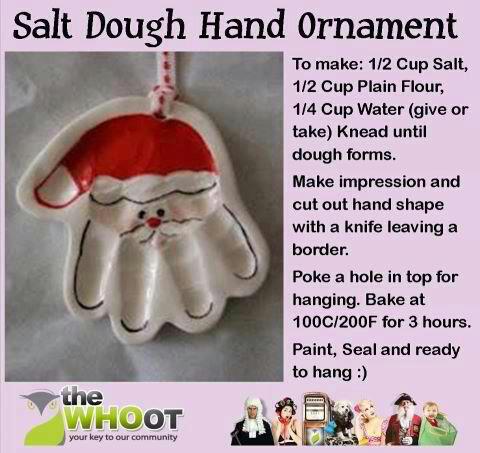
Picture
How cute is that!
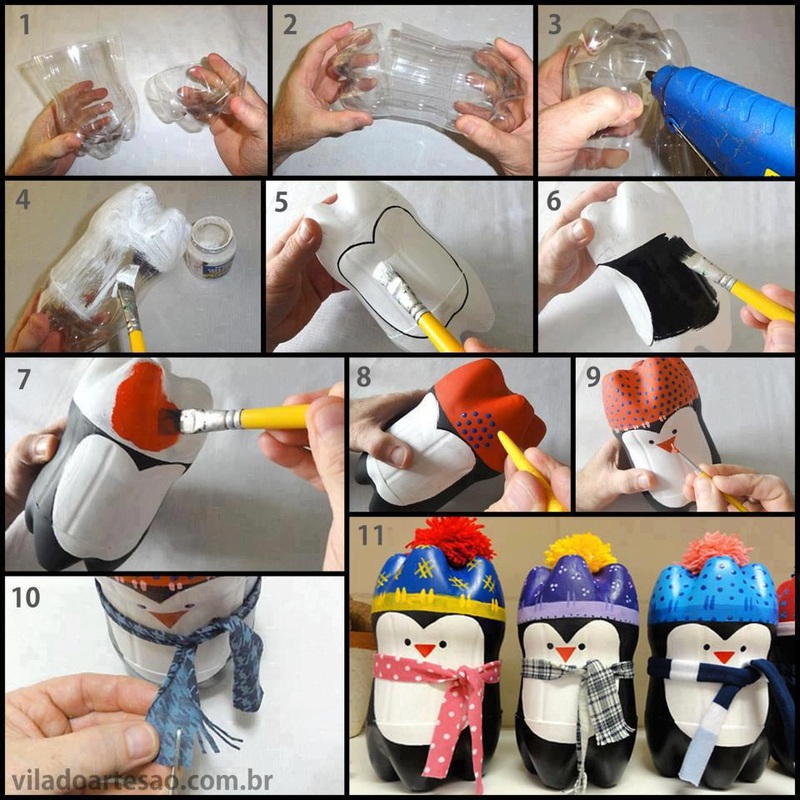
Next, I LOVE these little guys, and would love to have a collection of them.
Picture
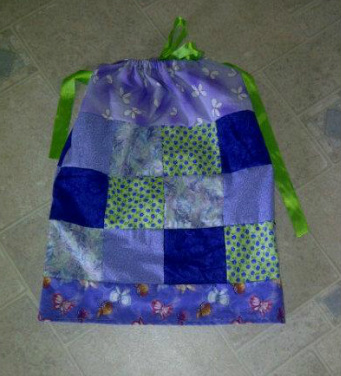
Also, topping the cute sale, are these:
Picture
Growly Bear is a little too young this year I think, but next year these would be great!
Picture
Picture
Picture
Picture
How fun is this for busy little people! Maybe it would even help keep them away from the real deal... at least momentarily.
Picture
Picture
And finally, a super cute idea for gift tags!
Picture
If any of you busy mommas out there have time to create, send me your pics! I'd love to see your masterpieces.
One thing I do always seem to find time to create is goodies, so here's my latest Christmas Cookie recipe to share with you all.
Love and hugs
Picture

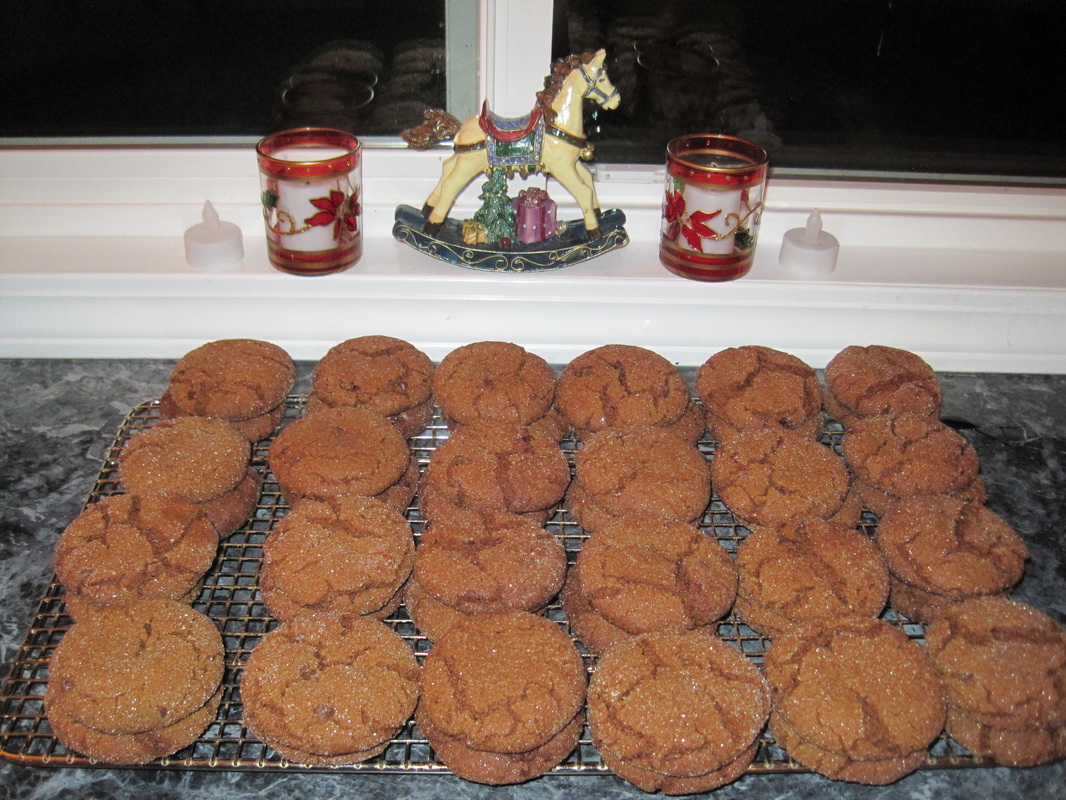
Best Soft Gingersnaps,
(With or Without Chocolate Chips)

Ingredients:
  • 1 1/2 cups butter (no substitutes), softened
  • 2 cups white sugar
  • 2 eggs
  • 1/2 cup molasses
  • 4 1/2 cups all-purpose flour
  • 3 teaspoons baking soda
  • 2 teaspoons ground cinnamon
  • 1 teaspoon ground ginger
  • 1 teaspoon ground cloves
  • 1/2 teaspoon salt
  • 1/2 teaspoon ground nutmeg
  • 1 cup good quality mini chocolate chips (optional)
  • Additional sugar for rolling

Directions:
In a mixing bowl, cream butter and sugar. Add eggs, one at a time, beating well after each addition. Beat in molasses. Combine the flour, baking soda, cinnamon, ginger, cloves, salt and nutmeg; gradually add to creamed mixture. Stir in chocolate chips if using.
Refrigerate for 1 hour or until dough is easy to handle.
Roll into 1-in. balls; roll in sugar. Place 2 in. apart on greased baking sheets. Bake at 350 degrees F for 8-12 minutes or until puffy, lightly browned, and cracked. Cool for 1 minute before removing to wire racks.

Note: Can use 4.5 teaspoons of Gingerbread Spice instead of the individual spices

Like my blog? Please don't forget to vote!
Vote for me @ Top Mommy Blogs - Mom Blog Directory
0 Comments

Oh The Dresses I Can Make!

9/12/2012

3 Comments

 
Another full week has passed, and I haven't posted. Clearly, I'm a terrible summer-time blogger.
I'm using the term "summer-time" loosely here seeing as we've had the woodstove lit for 3 of the past 5 days. Fall is quickly approaching!
Which leads me to the main reason I've been absent, again.
My bossy friend informed me a couple weeks ago that we were going to take part in this yeas Christmas Craft Fair. She told me we were going to rent a table together, and she was going to sell some stuff she's been working on, and I was going to make and sell pillowcase dressed.
After having to google "pillowcase dress" to find out what the hell one was, I told her there was no way I was talented enough with a sewing machine to pull that off.
Her being her bossy self started sending me website after website with instructions on "easy pillowcase dresses". Subtle she is not!
I finally was feeling inspired and kinda crafty one morning, so I got my hubby to locate and retrieve my long lost tote full of fabric, and I got to work!
The first one I made went pretty quickly, and turned out not near as crappy as I thought it probably would! Yay me!
Picture
Picture
So then I made an itty bitty baby one next....
Picture
And then I decided to shake things up and try a couple new designs !
Picture
Picture
Picture
I would love to provide a tutorial, and fully intend to one day, but I'm currently still at the stage where I'm cutting and sewing and saying a little prayer that it doesn't look like ass when I'm done.
Off to bed now to dream up fabric combinations. (I'm seriously telling the truth... for past week I lay in bed and go through my fabric stash in my mind pairing different ones together and thinking about how I can put them together. I think I have a problem....)
Love and Hugs

Please take a second to vote for my poor little blog which has fallen too many spots to count
Vote for me @ Top Mommy Blogs - Mom Blog Directory
3 Comments

Tutu Adorable Dress

4/30/2012

2 Comments

 
As I've mentioned before, I wish I was crafty. I'm not. At all. I try hard! My projects almost always end in disastrous results. That's assuming I finish them at all. My attention span is short. Quite often, by the time I get things set up and started, I get bored and realize it's not as much fun as I thought it was going to be, and then then I get side tracked, "Look! A squirrel!"
The crafty mess starts to annoy me after sitting out for a couple weeks, and I end up throwing everything into a box, with no attention to any kind of organization, and the box gets put into the back room until my husband does a dump run the next time the clutter gets to him.
So for the most part, I've given up even trying. At least until recently!
With the help of Pinterest, and a crafty girlfriend I can copy, and helpful Mr. Goggle, I've actually been feeling kidna inspired to make some cool things for Growly Bear's big 1st Birthday bash that's coming up at the end of May.
One of the things I want to do as part of the 1st Birthday celebration experience, is get "Cake Smash" photos done. For those of you not familiar with that term, you basically make and decorate (or buy) a cake, and dress your adorable little baby up in not much of anything, and let your little one massacre it as you capture it on film (or I guess capture it on "memory card" in this day and age...?)!
Luckily, the same girlfriend of mine who's crafty, also happens to be a photographer! (You've seen her work on my blog on my "Family Photo Wall" post). So, we've been planning this photo shoot for weeks, and having lots of fun talking about props and decorations and all that good stuff. And then a couple weeks ago, one of us came across a Cake Smash photo shoot online where the adorable little girl was wearing a pink tutu halter dress!!! And needless to say, we decided Growly Bear HAD to have one so we could work it into her photo shoot too!
So, me, the crafty-mommy-wanna be decided to make it for her. And you know what, it turned out not half bad!

What You'll Need
Measuring Tape
Tutu Elastic (or any elastic that's about 1/2 inch wide)
Needle and Thread
6 inch wide Tulle on a spool (Around 100 yards)
Ribbon (For the halter)
Silk flower
Scissors
A large coffee can
Picture
Have fun with your color combo! Clearly, we were going for a "Diva" look here, but you can go with whatever theme you'd like.

First, I measured Growly Bear around her chest where I wanted the top of the tutu to sit. Her chest was 19 inches around. I subtracted 1.5 inches from this number, and cut my tutu elastic that length, so 17.5 inches. (The elastic stretches while you're tying the tulle, so you want to make sure to subtract the 1.5 inches, otherwise it will be too big). Sew your elastic together, letting it overlap a half inch. In the end, the elastic will be 2 inches smaller then the measurement you took of your child's chest.
Next, I measured from where the elastic would sit around her chest, to her feet. (I'm making a full length tutu dress. You can easily make a shorter one if you'd like). From her chest to her feet was 23 inches long. Double this number (you'll be folding your tulle in half) and add 1 inch (to allow for the knot), and this is the length you'll need to cut your tulle. So, I ended up cutting my tulle lengths 47 inches long. I have no idea how much I used. I just cut a bunch, to get started, and ended up needing to cut more when I was half done.
Place your elastic around your coffee can. Fold your tulle in half, and create a loop.
Picture
Loopy Loopy!
Place the loop under the elastic so that the loop is coming out the top.
Picture
Bend your loop down, and pull the tail ends of the tulle up and through the loop. (On one of the sites I was reading with instructions, they called this a "slip knot"... I have no idea what that is, so I have no idea if that's that correct term, but if that helps you, then fantastic!)
Picture
Like so...
Gently, but firmly, pull the knot tight. Make sure you gather and pinch the knot together so that it's very compact. You want each knot as tight as possible so that your tutu dress will be really full.
Picture
Kinda like this
Play with different patterns and combinations. Once you find one you like, repeat about a million times, and you'll be left with something like this...
Picture
Kinda cute hey?
Finally, all that's left to do is cut and tie the halter ribbon, and attach the flower to hide the knot. I just estimated the length of the ribbon, making sure to leave enough for a nice bow at the back of her neck. And I gently sewed on the flower. Finished product....
Picture
Ta-Da!
I wasn't going to share any photos of her wearing it until the photo shoot reveal, but this one is just too cute not to share!
Picture
Excuse the poor quality and not very accurate colours - I took this photo on my phone.
Hope you're all inspired to make something crafty now!
Love and Hugs

Did you enjoy my crafty attempt? Please vote for my blog by clicking the link below. One much appreciated click, and your vote is automatically calculated. Thanks!
Vote for me @ Top Mommy Blogs - Mom Blog Directory
2 Comments
    Just Click To Send A Vote For Us @ Top Mommy Blogs

    Author

    _

    _I'm an unorganized, wanna be neat freak. I love my husband and my baby girl, jeans with the "comfort" waistband, online shopping, cheesy 80's tunes and anything chocolate. On a good day I'm kinda awesome. On a bad day, not so much.
    Follow Me on Pinterest

    Blogs I Love

    Grab my Badge!


    Archives

    April 2015
    September 2014
    August 2014
    January 2014
    September 2013
    July 2013
    April 2013
    March 2013
    February 2013
    January 2013
    December 2012
    November 2012
    October 2012
    September 2012
    August 2012
    July 2012
    June 2012
    May 2012
    April 2012
    March 2012
    February 2012
    January 2012

    Categories

    All
    Animals
    Anniversary
    Another First
    Bathroom
    Bath Time
    Beach
    Birthday
    Cake
    Cake Smash
    Car Ride
    Chocolate
    Christmas
    Cleaning
    Cookies
    Cooking
    Crafty
    Crawling
    Crazy
    Day Care
    Decorating
    Devastating
    Dirty House
    Drinking
    Dust Doggies
    Earthquake
    Easter
    Eating Plan
    Family
    Fireman
    Food
    Friends
    Fun Facts
    Funny
    Fussy Baby
    Grama
    Grossness
    Growing Up
    Growly Bear
    Hair
    Halloween
    Hangover
    Hassellhoff
    Holiday
    Home
    House
    Husband
    Important Moments
    Lazy
    Learning
    Messy House
    Mexico
    Milestone
    Mishap
    Mommy Confession
    Mom Stuff
    Mother
    Movie
    Nesting
    New Baby
    Outside
    Party
    Patience
    Perfect Day
    Photo Shoot
    Pinterest
    Plane Ride
    Play School
    Pms
    Potty Training
    Pregnancy
    Recipe
    Sad
    Sappy Mommy Moments
    Sewing
    Shopping
    Sick
    Sleep
    Snow
    Spider
    Study
    Summer
    Sunshine
    Teething
    Thankful
    Things I Want
    Tired
    Travel
    Ugly Cake
    Walk
    Walking
    Waxing
    Working Mommy
    Worlds Best Daddy

    Loading
    Free Counter

    RSS Feed

Powered by Create your own unique website with customizable templates.